Range Buddy Target Analysis

Range Buddy / SubMOA User Manual

This is the target analysis screen, which is the core function of the Range Buddy App. It may look confusing at first, because there are so many things you can accomplish here. Please click on the button icons and learn details.

Bullet Hole Button

Remove Bullet Hole Button

POA Button

Group Notes Button

Session Info Button

Ruler Button

Rotate Button

Session Setting Button

User Preference Button

Save Result Button

Share Button

Back Button

Green anchor

Font + Button

Ruler End Points

Font - Button

Clear Button

Switch Group Button

Start new Group Button

Picture in Picture Button

Session Notes Button

Zoomin Button

Set Location Button

Zoomout Button

Remove Picture Button

Close Menu Button

Bullet Button

Clicking on this button will place a bullet hole mark (red circle) on the current green mark location. Please pay attention to The size of the bullet mark. If you set the bullet diameter and reference size correctly, the size of the mark should be very close to the bullet holes on the target.

Card image cap

Correct Setting

Reference size and bullet diameter is correct.

Card image cap

Incorrect Setting

Wrong settings. In this case, the ammo is 223 Remington, but bullet diameter was set to 0.308"

Remove Bullet Button

Clicking on this button will remove the last bullet hole placed. There must be at least 3 bullet holes to be a group.

POA Button

Clicking on this button will set the POA (point of aiming) location for the group. Each group will only have 1 POA. The app will calculate the vertical and horizontal difference between the POA and the POI (point of impact) if the POA is set. If the scope adjustment was set, the app also calculates the elevation and windage adjustments

Group Notes Button

Clicking on this button will add the group notes on the target. Group notes contains group analysis results. The user can set the label format in the preference screen.

Group Notes Button

Clicking on this button will display more detailed information about the shooting session.

Ruler Button

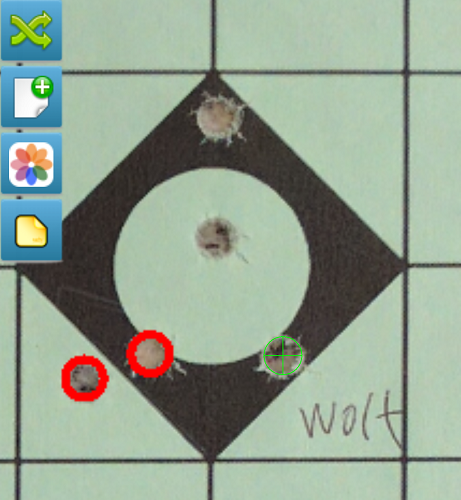
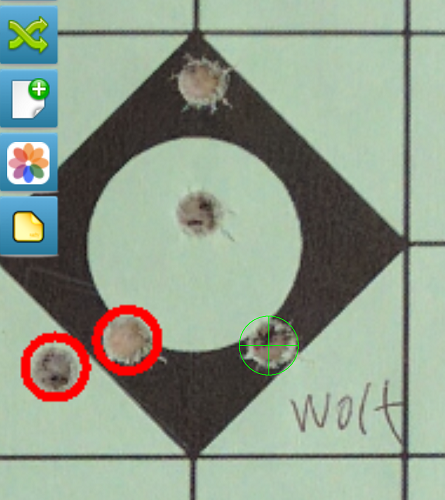
The app calculates group size by counting the pixels on the target picture between bullet holes, but the app has no idea how to translate pixels to real distance without knowing the reference size.

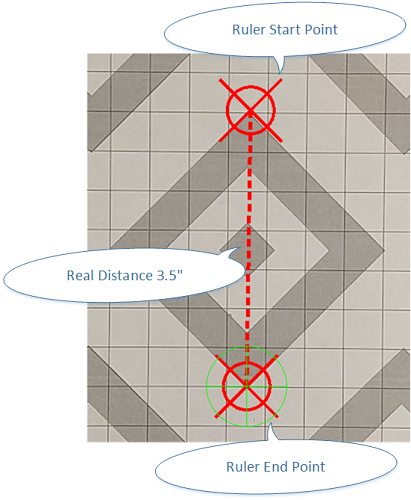
The reference size is the real distance (inch or mm) between 2 locations on the target picture, The user can mark 2 locations on the target picture, which they know the distance of, and enter the distance . The app will know how to calculate real distance based on pixel counts.

To set the reference size:

1. Identify 2 locations you know the real distance of.

2. Moving the picture, put location #1 under the green mark.

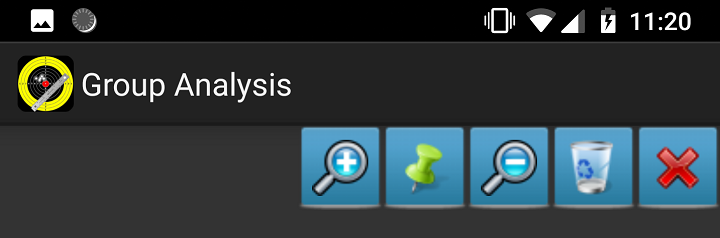
3. Click the ruler button, a red start ruler mark will be put on location #1

4. Moving the picture, put location #2 under the green mark. A red line will appear between the 2 locations

5. Click the ruler button, a dialog window will appear and let you enter the real distance.

6. Click on OK button, the reference size was set

You can do this process multiple times if something is not right.

Rotate Button

This button is used to rotate the target picture. Each click will rotate the picture 90 degree clockwise. Be careful, rotating the target will erase all bullet holes and POAs on the target.

Session Seeting Button

This button will bring up the session setup screen. You can enter information such as firearms, ammo, shooting distance, range name, range date, and the shooter's name for your shooting session. This session information will apply to all groups on the target. The session information can be printed onto the target as session notes.

User Preference Button

This button is used to set user preferences such as measurement system and label format. Users can also choose what group or session information to print onto the target.

Save Button

This button saves analysis result and target image as shooting results. A new record will be created every time this button was clicked. This design allows users to create multiple analysis groups with the same target image. If there are multiple groups on the same target, the saved record will be the average of all groups.

It's user's choice how he want to orgnize the records.

Share Button

On Android, this button allows users to share the current target image with analysis results to any email or social media apps.

On iOS, the picture will be copied to the camera roll

Share Button

This button takes users back to the home screen. If the analysis result is not saved, the app will pop up a warning message.

Green Anchor

The green mark is fixed at the middle of the view window. It's the location where elements such as bullet holes, POA and notes will be placed at. Users change the locations by dragging the target picture.

The size of the green circle should be closely match the bullet holes. If the green circle is larger or smaller than the bullet hole, your reference size may not be set correctly, or the bullet diameter is not right.

Card image cap

Correct Setting

Reference size and bullet diameter is correct.

Card image cap

Incorrect Setting

Wrong settings. In this case, the ammo is 223 Remington, but bullet diameter was set to 0.308"

Clear Button

This button removes all analysis data on the target, include groups, bullet holes, POA, groups and session notes.

Switch Group Button

This button allows users to toggle between multiple groups on the target. The bullet holes in an active group are red. The bullet holes in a non-active groups are black. The active group is the "working group" that accepts all user inputs.

Switch Group Button

This button allows user to start a new shooting group. When a new group is created, the old groups became non-active. If the target has multiple groups, the saved results will be the average result of all groups.

Picture in Picture Button

This button allows user to paste the picture of anything, such as equipment setup, range, or even shooter's photo. Users need to select a picture from local device. The Picture in Picture buttons lets users change the size and location of the picture. Only one picture is allowed.

Switch Group Button

This button prints the session information on the location of the green mark. Users can choose what information and the label format to be printed in user preference screen.

Increase Font Button

This button increases the font size of all group notes and session notes.

Decrease Font Button

This button decreases the font size of all group notes and session notes.

Zoom in Button

This button increases the size of the PIP picture by 10%.

Set Button

This button sets the location of the PIP picture on the green mark.

Zoom Out Button

This button decreases the size of the PIP picture by 10%.

Remove PIP Button

This button removes the PIP picture.

Close Button

This button hides the PIP picture button group and show the side button group and font button group.